Updated: May 2026
Can you see too much of your neighbor while you’re on your deck? Does that weird neighbor look over the fence a little too much when you’re in your hot tub? Are you tired of small talk from across the fence when you’re just trying to crack open a Stella on a hot summer day?
Impact-Site-Verification: 0650d2bc-6694-441a-84cd-972e0b982ac1
If you answered yes to any of those, you need a privacy screen for your deck.
It may seem impossible to add one since your deck has already been built — good news, it’s absolutely doable to add a privacy screen to an existing railing, and it can be knocked out in just one day. This is also one of the most affordable projects you’ll tackle as part of a larger split-level modernization — at under $100 in materials, the privacy-to-dollar ratio is hard to beat.
What It Costs: Materials Breakdown (2026)
| Item | Estimated Cost |
|---|---|
| 4×4 or 6×6 posts (2–4 depending on length) | $20–$50 |
| Slat/board material (leftover deck boards or new) | $0–$30 (free if using scraps) |
| Lag screws | $8–$15 |
| Deck screws | $8–$15 |
| Exterior construction adhesive (optional but recommended) | $5–$10 |
| Total | $41–$120 depending on material choices |
Using leftover deck boards as your slat material drops this firmly under $100. Buying new boards pushes it slightly over on the high end. Either way, this is one of the most affordable deck upgrades you’ll find.
Tools Needed
You'll need it for this project, and almost any other wood project you'll do. I'm biased, but I stick with Makita.

Another must have for this project, and many more projects. You'll thank yourself later for getting this now.

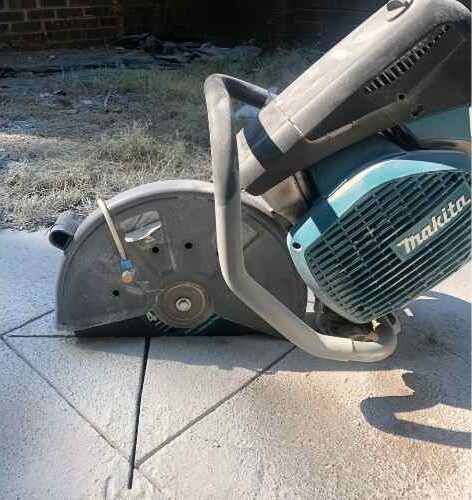
- Makita circular saw — for cutting posts and slat material to length. A quality cordless circular saw makes clean, accurate cuts without binding on pressure-treated lumber.
- Makita multi-tool — essential for notching out the deck rail where the posts will sit. You can’t get a circular saw into these tight spots cleanly; the multi-tool is purpose-built for this exact application.
- Hammer drill — needed for driving lag screws. Standard drills bog down on lag installation; a hammer drill or impact driver makes it significantly easier.
- Level — every post needs to be checked for plumb before securing. A post that’s even slightly out of plumb becomes very obvious once the slats are on.
- Tape measure, pencil, square

Giveaways, Ebook, and Forum coming soon. Be the first to know about new content!
Materials Needed
- Post material — 4x4s or 6x6s depending on how substantial you want the screen to look. 4x4s work fine for most applications; 6x6s add visual weight and are worth it for taller screens.
- Slat/blind material — I used leftover deck boards, but options include fence pickets, cedar planks, a trellis panel, or even a solid plywood panel. More on material choices below.
- Exterior deck screws — for attaching slat material to posts
- Lag screws — for securing posts to the deck rim joist. Size depends on your deck construction but should be long enough to pierce the post and rim joist completely.
Choosing Your Blind Material
This is where the project gets personal. The slat or panel material you choose determines the final look, the airflow, and the wind resistance of the finished screen. Here are the main options:
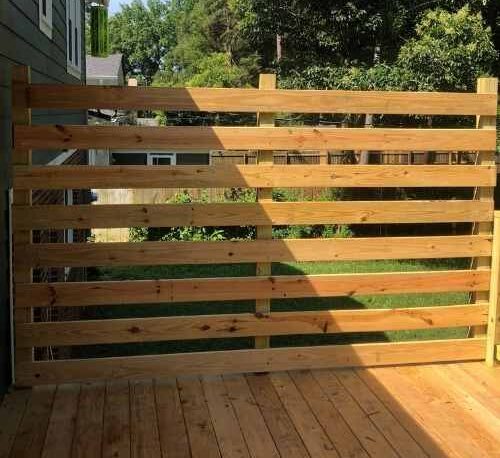
- Leftover deck boards (what I used): Free if you have scraps, and they match the existing deck perfectly. Attached slightly overlapping on both sides of the posts, they allow some airflow while providing solid privacy. My preference.
- Fence pickets: Inexpensive, easy to work with, and widely available. Dog-ear cedar pickets give a classic look; flat-top pickets give a cleaner, more modern appearance.
- Cedar planks: Step up in appearance, natural rot resistance, and smell great. Worth it if the deck is visible from the street.
- Trellis panel: Allows airflow and light while still providing privacy. A climbing plant growing through a trellis screen is one of the better-looking low-cost deck upgrades available.
- Solid plywood panel: Maximum privacy, minimum airflow. See the wind note in Step 5 before going this route.
If you’re not sure what you want, Pinterest has no shortage of deck privacy screen inspiration — worth spending 20 minutes browsing before you commit to a material.
Step by Step: Building the Privacy Screen
Step 1: Assess Whether It Will Actually Work
Before buying a single board, confirm that a privacy screen in the planned location will actually give you the coverage you need. A simple way to test this: hold up a large bedsheet or curtain in the approximate area where the screen will go and check if it blocks the view you’re trying to eliminate.
Sometimes the view you want to block requires coverage on a side where there isn’t enough deck to work with, or where the angle means no reasonable screen height will do the job. Better to find this out with a bedsheet than after the posts are set.
Also consider sun angle if you use the deck for sunbathing — a privacy screen on the wrong side can block the sun at peak hours. Think through how the screen will affect the deck at different times of day before committing to a location.
Step 2: Remove Existing Railing in the Screen Area
If the deck has an existing railing in the area where the screen will go, it will most likely need to come out. The post-and-slat method used in this tutorial doesn’t accommodate an existing railing in the same section — the posts replace the railing in that area.
Remove the railing carefully in the screen area, being mindful not to damage the decking surface or the rim joist where the new posts will attach. The railing that stays on adjacent sides of the deck is what your screen will butt up against, so don’t damage those sections.
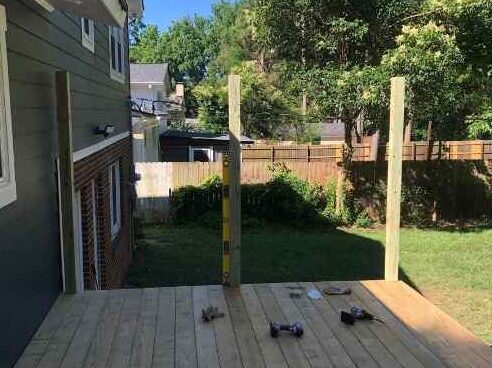
Step 3: Plan Post Locations
Posts should be spaced no more than 4 feet apart. Some sources suggest wider spacing is fine, but with the added weight of deck boards used as slat material, any wider spacing leads to sagging over time. Wind gusts add additional strain on the posts — tighter spacing means more durability.
Use a small offcut of your 4×4 post as a template for marking the notch locations on the deck rim. This is important: actual 4×4 lumber measures 3.5” x 3.5”, not 4” x 4”. Marking a 4” space gives you too much play and a sloppy-looking base that’ll need to be covered. Use the actual post piece as your template to mark the exact width.
Step 4: Notch the Deck Rail, Cut and Set the Posts
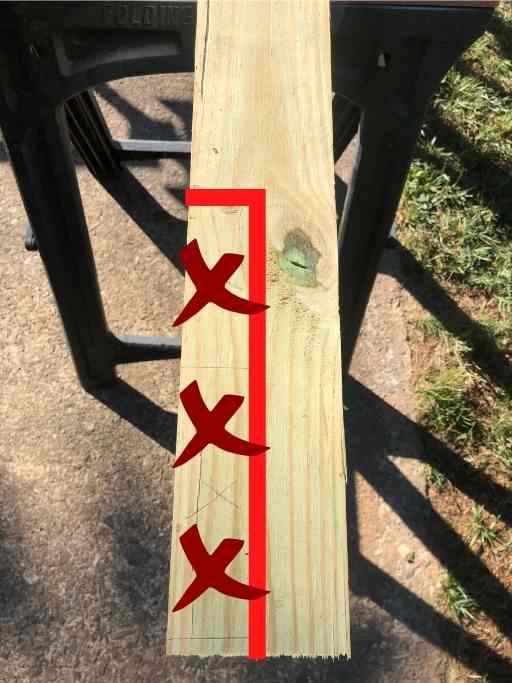
Use the multi-tool to notch out spaces in the deck rail for each post. The notch should be just wide enough for the post to sit snug — no wiggle room. A tight fit here is what makes the finished screen look intentional and professional rather than bolted-on.
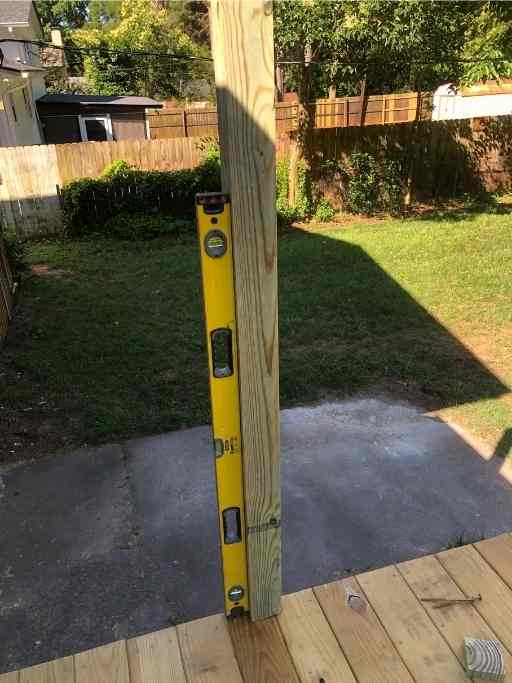
Each post needs to be notched at the base, creating a lip that sits flat on the deck surface. The uncut portion — the “tail” — should be the length of the deck’s outer rim joist. You want as much surface contact between the post tail and the rim joist as possible. This surface contact is what provides the structural integrity of the whole screen.
Setting posts is a two-person job. One person holds the post level and plumb — checking both faces with a level and making sure it doesn’t lean in or out — while the second person drives the lag screws from outside the deck through the rim joist and into the post tail. Pre-drill a pilot hole first to give the lag screw a clean pathway and prevent splitting.
These are what attaches the posts to your deck's rim joist. They are strong enough to support the weight of the posts and boards you attach later.

Tip: If you’re confident in your positioning, apply a bead of exterior construction adhesive inside the post tail notch before setting. This gives the connection extra holding strength and is especially useful in windy climates. Some adhesive will squeeze out when the post is fastened — wipe it off immediately with a wet rag before it cures. Repeat the notch, cut, and set process for every post.
Step 5: Attach the Blind Material

This final step is entirely up to you. Once the posts are set, you can attach whatever material you want. I used extra deck boards cut to size, attaching them to both sides of the posts with a slight overlap to add texture and depth. This approach allows some airflow while still providing solid privacy — and since the boards match the existing deck, the screen looks like it was always part of the build.
Other options: a full trellis panel for a climbing plant, a solid plywood panel for maximum privacy, or horizontal cedar planks for a more finished appearance. Whatever you choose, drive your deck screws at a consistent spacing for a clean look.
⚠️ Wind note: If you opt for a solid panel rather than spaced slats, be aware that it will act like a sail in high wind gusts — putting significant lateral stress on the posts and the lag screw connections at the rim joist. In areas prone to high winds, stick with a material that allows airflow (spaced boards, trellis, or louvered panels) rather than a solid panel. The spaced-board method I used handles wind well because air passes through rather than pushing against it.
Frequently Asked Questions
How much does it cost to add a privacy screen to a deck?
Using leftover deck boards as slat material, this project runs $40–$70 in materials. Buying new boards or cedar planks pushes it to $80–$120. Either way it’s one of the most affordable deck upgrades available — under $100 is realistic for most builds.
Can I add a privacy screen to an existing deck without removing the railing?
The post-and-slat method in this guide requires removing the railing in the screen section since the posts replace the railing there. If you want to keep your existing railing, a pre-made privacy screen panel that mounts to or over the railing is an alternative — these are available at most home improvement stores and require no carpentry.
How far apart should privacy screen posts be spaced?
No more than 4 feet apart. With the weight of deck board slats and the lateral force of wind gusts, wider spacing leads to sagging and loosening at the rim joist connection over time. Tighter spacing means a more durable screen that holds up over years, not just one season.
What is the best material for a DIY deck privacy screen?
Leftover deck boards are the best value since they’re free if you have scraps and match the existing deck. For new material, cedar fence pickets are the best bang-for-buck option — naturally rot resistant, easy to cut, and they look great stained or painted. A trellis panel is the best option if you want airflow and plan to grow climbing plants through it.
You’re Done
Now you can finally relax on your deck without worrying about the peeping eyes from next door. Hang out naked on your deck — it’s your property, you built the screen yourself, and you deserve it.
If the privacy screen is part of a larger deck project, check out the full guide to building a raised deck over concrete for the complete build from footings to deck boards. And if you’re working on curb appeal alongside the deck, the front porch column replacement guide is the natural next exterior project — the combination of a new deck and updated porch columns is one of the most impactful one-two punches for split-level curb appeal.

Max
Max Lowrie, founder of MySplitLevel.com® and author of The Live In Flip© bought his first split level house in 2016. During a lengthy renovation, Max noticed that there was little useful content online specific to split-level homes. Max now devotes his time to share his knowledge hoping to help homeowners avoid unnecessary mistakes, and provide a blue print for split-level owners nationwide.
Giveaways, Ebook, and Forum coming soon. Be the first to know about new content!