Updated: May 2026
Have you ever put real money into your home’s exterior — new siding, fresh windows, a full repaint — and still felt like something was off? Nine times out of ten, the missing piece is the window trim. It’s one of the smallest details on a house, but it’s doing a lot of heavy lifting for your curb appeal.
I learned this firsthand on my own split-level. After replacing the siding and windows, the house still looked flat. Adding modern exterior window trim was the thing that finally tied it all together — and it cost a fraction of everything else I had already done.
In this post I’ll walk you through how to pick the right style, what materials to use (and what to skip), exactly how to install it, and how to make sure it lasts. Whether you’re doing a full exterior renovation or just want to add some character to existing windows, this guide covers it.

Exterior Window Trim Ideas
The first thing to figure out is the style of trim you want. I did what I’d recommend to anyone: I walked around the neighborhood and took pictures of newer Craftsman-style homes being built nearby. A few styles kept showing up again and again.
For my own home, I landed on the Winterfield — four flat boards, clean corners, dead simple to cut and install. It looks intentional without being fussy, which is exactly what a split-level needs. If you want something with more presence, a Craftsman cap with a slight overhang on the top board reads really well on homes with horizontal siding.
Whatever style you choose, the main thing is to keep it consistent across all your windows. You can make one feature window a little bolder if you want, but mixing radically different trim profiles on the same facade tends to look chaotic rather than designed.
Best Materials for Exterior Window Trim
This is where most DIY window trim projects go wrong, and it’s worth spending a few extra minutes on before you buy anything.
Skip the Pressure-Treated Wood
A lot of tutorials will tell you to use pressure-treated lumber because it’s cheap and rot-resistant. I’d steer you away from it for trim. Pressure-treated wood warps and twists as it dries, which causes paint to crack and caulk to pull away from the seams. That’s exactly how water gets in — and water getting in is what you’re trying to prevent.
What to Use Instead
PVC trim board is the gold standard for exterior window trim. It won’t rot, won’t swell, and holds paint exceptionally well. It’s what I used on my front porch columns, and I’ve had zero issues. The main downside is cost — expect to pay roughly $2.50–$4.00 per linear foot depending on width and brand (2026 pricing).
Composite trim (like Trex Trim) is a solid middle-ground option. It’s more affordable than PVC, still far more durable than wood, and usually comes pre-primed. Good choice if you’re trimming a lot of windows and budget is a real consideration.
Fiber cement trim (like HardieTrim) is another strong option, especially if you’re already using fiber cement siding. It’s paintable, durable, and very stable — but heavier to work with and requires carbide-tipped blades to cut cleanly.

Giveaways, Ebook, and Forum coming soon. Be the first to know about new content!
Tools You’ll Need
-
 Check Price
This is the saw I use and its held up for years doing multiple projects. They also make a battery version but it's a little more expensive
We earn a commission if you make a purchase, at no additional cost to you.
-
 Check Price
Much more reliable for exterior projects than a finish nailer. Use nails that have a head, and make sure theyre rated for exterior applications.
We earn a commission if you make a purchase, at no additional cost to you.
-
 Check Price
Honestly, just get a speed square, you're going to need it for a project at some point.
We earn a commission if you make a purchase, at no additional cost to you.
-
 Check Price
Craftsman has my favorite tape measures because they don't lose their strength at long distances.
We earn a commission if you make a purchase, at no additional cost to you.
-
 Check Price
Often skipped. Never should be. More on this below.
We earn a commission if you make a purchase, at no additional cost to you.
Before You Start: Flashing and Moisture Barrier
This step gets skipped constantly in DIY guides, and it’s the reason trim fails early. Before any trim board goes up, the area behind it needs to be protected from water intrusion.
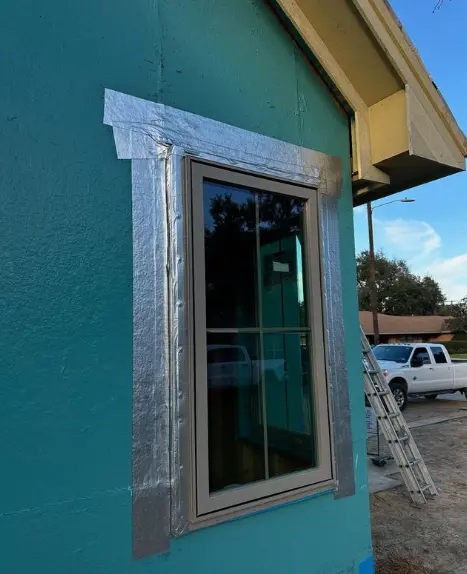
If you’re installing trim as part of a new siding job, make sure the window is properly flashed — with self-adhering flashing tape over the nailing fin, lapped correctly over the housewrap. The top flashing goes on last so water drains down and away.
If you’re adding trim to existing windows without touching the siding, run a bead of caulk along the back edge of each trim board before nailing it up. This creates a secondary seal. It’s not a substitute for proper flashing, but it’s far better than nothing.
The trim itself isn’t a weatherproofing layer — it’s a finish layer. The caulk and flashing behind it are what keep water out.
How to Install Modern Exterior Window Trim
Now the actual installation. I’ll walk through the Winterfield style (four flat boards), since it’s the most versatile and beginner-friendly. The same sequence applies to most other styles.
Install order: sides first, then bottom, then top. Always.
Step 1: Remove Old Trim (If Any)
Use a utility knife to score the caulk line, then work a pry bar behind the trim carefully. You’re trying not to damage the siding underneath. Take your time here — aggressive prying creates work for yourself later.
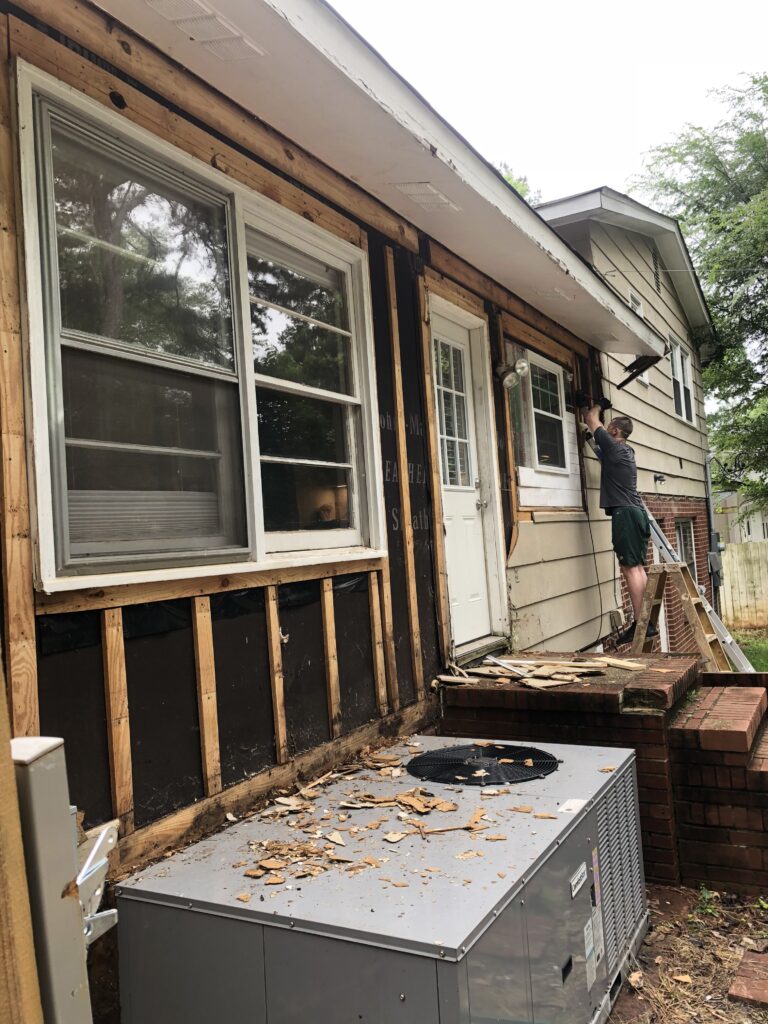
If you need new siding, install the trim before replacing the siding like I did. The siding will be cut around this style of window trim and it makes it much easier.
Once the old trim is off, inspect the area behind it. If you see soft wood, discoloration, or mold, address that before anything new goes up. No point installing beautiful new trim over a moisture problem.
Step 2: Install the Vertical Side Boards
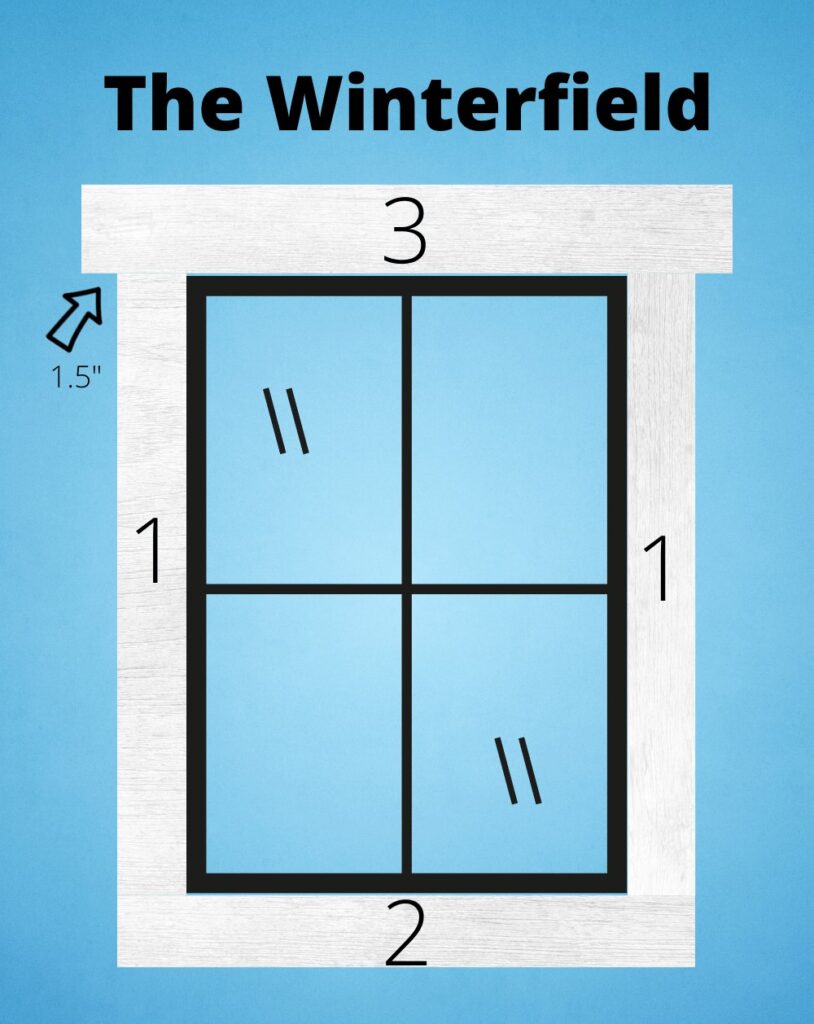
Measure each side of the window from the top of the rough opening to the bottom. Cut two pieces of trim to fit flush — no overhang above or below. These boards set the foundation for everything else, so make sure they’re plumb. Check with a level before nailing.
Nail into studs wherever possible. For PVC or composite trim, use stainless steel or hot-dipped galvanized nails to avoid rust staining over time.
Step 3: Install the Bottom Board
Measure the distance across the two vertical boards — outer edge to outer edge. That measurement is your bottom board length. The bottom board sits flush against the bottom edges of the vertical pieces. Cut, fit, and nail it in.
Remember this measurement — you’ll add 2″ to it for the top board in the next step.
Step 4: Install the Top Board (With Overhang)
Take your bottom board measurement and add 2″ — that’s 1″ of overhang on each end. This overhang serves a purpose: it sheds water away from the sides of the window. Center it carefully before nailing.
Double-check the alignment before driving any nails. An off-center top board is very visible from the street and surprisingly hard to unsee once you notice it. Step back and look from a distance before committing.
Step 5: Install Drip Edge
A metal drip edge along the top of the top trim board redirects rainwater away from the trim face and reduces how much water sits against the caulk joint. Slide it under the siding above and over the face of the top board, then nail it in place. Small detail, big long-term difference.
Step 6: Caulk All Seams
Use a good exterior-grade paintable caulk. Hit every seam: between boards, between trim and siding, and along the window frame itself. Smooth each joint with a wet finger or a caulk tool. This is not a step to rush.
Let it cure fully before painting — check the caulk packaging, but most need 24 hours.
How to Paint Exterior Window Trim

If the trim material you used came pre-primed (most composite and PVC boards do), you’re ready to paint after caulking. If not, apply a coat of exterior primer first and let it dry fully.
For the topcoat, use a high-quality exterior paint rated for trim. Sherwin-Williams Duration or Benjamin Moore Aura are both well worth the extra cost over budget paint. Trim takes more abuse than siding — direct sun, water runoff, physical contact — so this isn’t the place to save $20.
Apply two coats. The first will look uneven. The second coat is what makes it look professional.
Cost to Paint Exterior Window Trim (2026 Estimates)
If you’re hiring this out:
- Trim only (existing painted house): $1,200–$2,500 depending on home size and number of windows
- Full exterior including trim: $7,000–$14,000+ for most homes
- DIY paint cost for trim boards: $80–$150 in primer and paint for a typical 1,500 sq ft home
For a full breakdown of what exterior work costs on a split-level, see the complete renovation cost guide.
Pro Tips That Will Save You Time and Money
- Keep trim consistent across all windows. If you want to highlight a feature window, a cap or pediment on that one window works well — but everything else should match.
- Pre-cut in batches. Walk the house first and measure all your windows. Odds are good that several are identical. Once you know which ones match, cut all of those at once. You’ll save hours of back-and-forth to the saw.
- Plan your scrap. If you’re cutting a 48″ board from an 8-foot piece, think about what else that leftover could be used for before setting it aside. Small windows need short side boards.
- Measure twice, cut once — especially with PVC. At $3+ per linear foot, a bad cut on a wide board stings.
- Paint the back of each trim board before installing it. Water gets behind trim — a sealed back face slows moisture absorption if it does.
- Use stainless or hot-dipped galvanized nails. Regular nails rust and leave streaks through your new paint.
Frequently Asked Questions
What size should exterior window trim be?
For most homes, trim boards between 3.5″ and 5.5″ wide look proportionate. Smaller windows can go narrower; larger picture windows can handle wider trim. The top board (with overhang) should be the same width as the side boards or slightly wider.
Should trim go on before or after siding?
Trim goes on before siding in almost every case. The siding butts up to the trim, which creates a cleaner water management detail and a more finished look. If you’re adding trim to an existing sided house without re-siding, you’ll be butting the trim against existing siding — that still works fine with good caulking.
How long does exterior window trim last?
PVC trim installed correctly with good caulking and two coats of quality paint should last 20–30+ years without needing replacement. Wood trim in the same conditions might need attention in 7–10 years. The material choice really does matter.
Can I install exterior window trim without a miter saw?
For flat four-board trim like the Winterfield style, yes — all cuts are 90 degrees, which you can make with a circular saw and a speed square as a guide. A miter saw just makes it faster and cleaner. If your trim design involves any angled or mitered corners, you’ll want the miter saw.
Get To It
New exterior window trim is one of the highest-return projects you can do on a split-level. It’s visible from the street, it protects the most vulnerable part of your siding system, and it gives the whole exterior a finished, intentional look that paint alone can’t replicate.
Pick a style that fits the house, use the right materials, flash it properly, and caulk thoroughly. Do that and you’ve got trim that will look good for decades.
If you have questions about a specific window situation or want to share how yours turned out, drop a comment below.

Max
Max Lowrie, founder of MySplitLevel.com® and author of The Live In Flip© bought his first split level house in 2016. During a lengthy renovation, Max noticed that there was little useful content online specific to split-level homes. Max now devotes his time to share his knowledge hoping to help homeowners avoid unnecessary mistakes, and provide a blue print for split-level owners nationwide.
Giveaways, Ebook, and Forum coming soon. Be the first to know about new content!
