Updated: May 2026
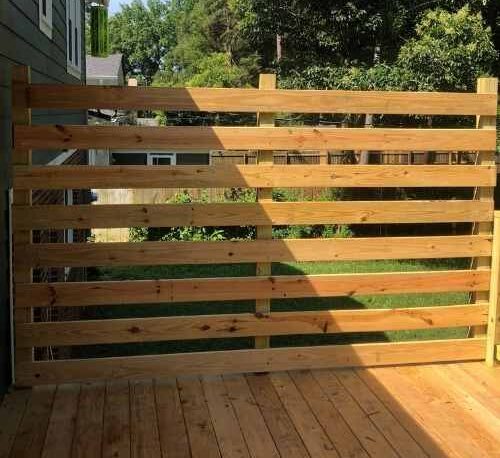
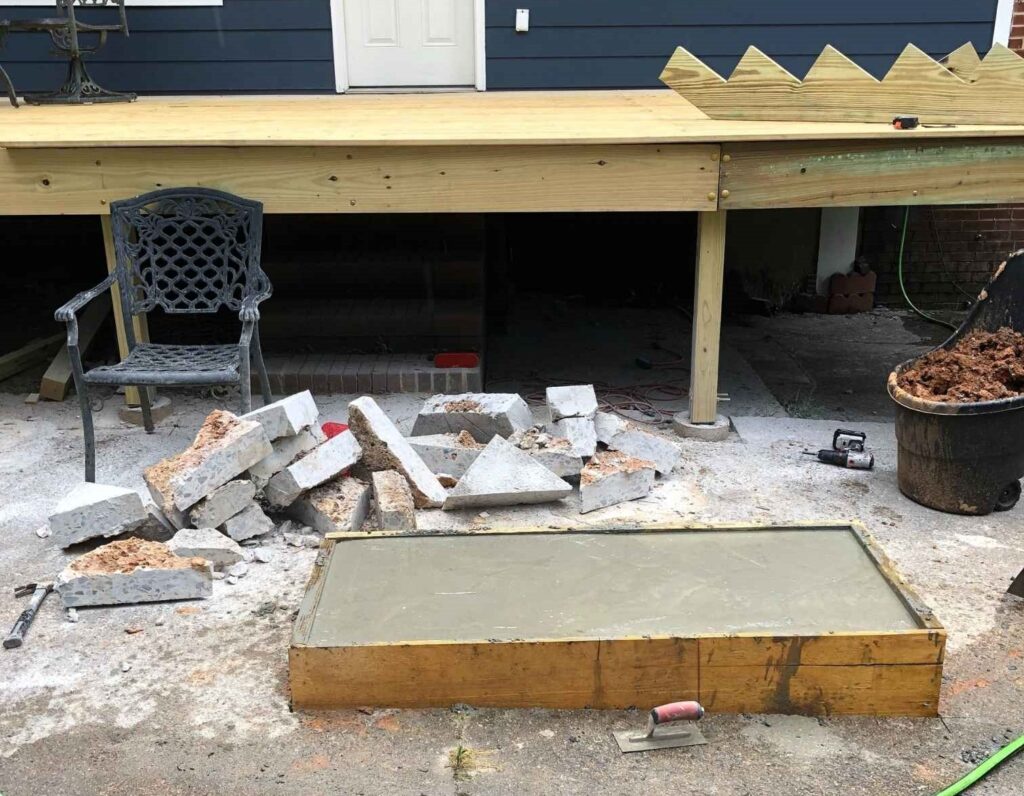
As we covered in the complete guide to building a raised deck over concrete, the surface below your deck stairs isn’t always going to cooperate. After building my own deck over an existing concrete patio, the area where the stairs needed to land was uneven enough that a standard stair assembly simply wouldn’t sit flat. The solution was pouring a small, level concrete pad for the stringers to land on — and it turned out to be one of the more satisfying parts of the whole project.
This guide walks through the full process: measuring, building forms, pouring, finishing, and anchoring the stairs to the finished pad. If you’re in the middle of a split-level modernization and a deck is on the list, this is the step that makes the whole stair assembly feel permanent and intentional rather than just functional.
How Much Does It Cost to Pour a Concrete Landing Pad?
This is one of the most affordable projects on a deck build. For a typical stair landing pad (roughly 3×4 feet, 4 inches deep), you’re looking at:
| Item | Estimated Cost |
|---|---|
| Quikrete 80lb bags (4–6 bags typical) | $25–$40 |
| Scrap plywood for forms | $0–$20 (usually scrap) |
| Tapcon screws for stair anchoring | $10–$20 |
| Pressure-treated 2×4 (stair anchor board) | $5–$10 |
| Total | $40–$90 |
Concrete pads can be deceiving on quantity — they require significantly more concrete than they look like they will. Always use a concrete calculator to get your exact bag count, then buy 2 extra. You can return unopened bags. Running out mid-pour while the concrete is already setting is an experience you don’t want to have.
Tools Needed
- Variable speed drill or hammer drill — needed for drilling pilot holes into the cured concrete when anchoring the stairs
- Circular saw or jigsaw — for cutting plywood forms to size
- Edging trowel — for rounding off the top edges of the finished pad while concrete is still workable
- Margin trowel or float — for smoothing the surface
- Level (4-foot minimum) — the whole point of this pad is that it’s level, so check it constantly
- Tape measure
- Concrete mixing tub or wheelbarrow
If you're doing any other concrete projects i reccomend this. A little overkill if this is your only project, however it saved my back BIG TIME!


Giveaways, Ebook, and Forum coming soon. Be the first to know about new content!
Materials Needed
- Scrap 3/4” plywood (for building forms)
- Deck screws or duplex nails (for assembling forms — duplex nails pull out easier after the pour)
- Quikrete 80lb bags — quantity per your concrete calculator result plus 2 extra
- One pressure-treated 2×4 cut to stair width (for anchoring)
- Tapcon 1/4” x 2-3/4” concrete screws — the industry standard for anchoring wood to concrete. Don’t substitute with regular concrete anchors for this application.
- Gravel or crushed stone (optional but recommended for drainage base in freeze-thaw climates)
Before You Start: Check for Utilities
If you’re pouring on bare ground rather than over an existing slab, call 811 before you dig. It’s the national call-before-you-dig utility locator service and it’s free. Buried conduit or gas lines can run close to the surface near exterior walls and deck areas. Takes five minutes and removes any uncertainty.
Step-by-Step: Pouring the Concrete Landing Pad
Step 1: Check for Moisture
If you’re pouring over or near an existing concrete surface, tape a piece of plastic sheeting to the ground and leave it for 48 hours. If moisture collects underneath, you have a drainage issue that needs addressing before pouring. A concrete pad poured over a wet or poorly drained base will heave and crack in freeze-thaw conditions within a few years.
Step 2: Measure the Landing Area
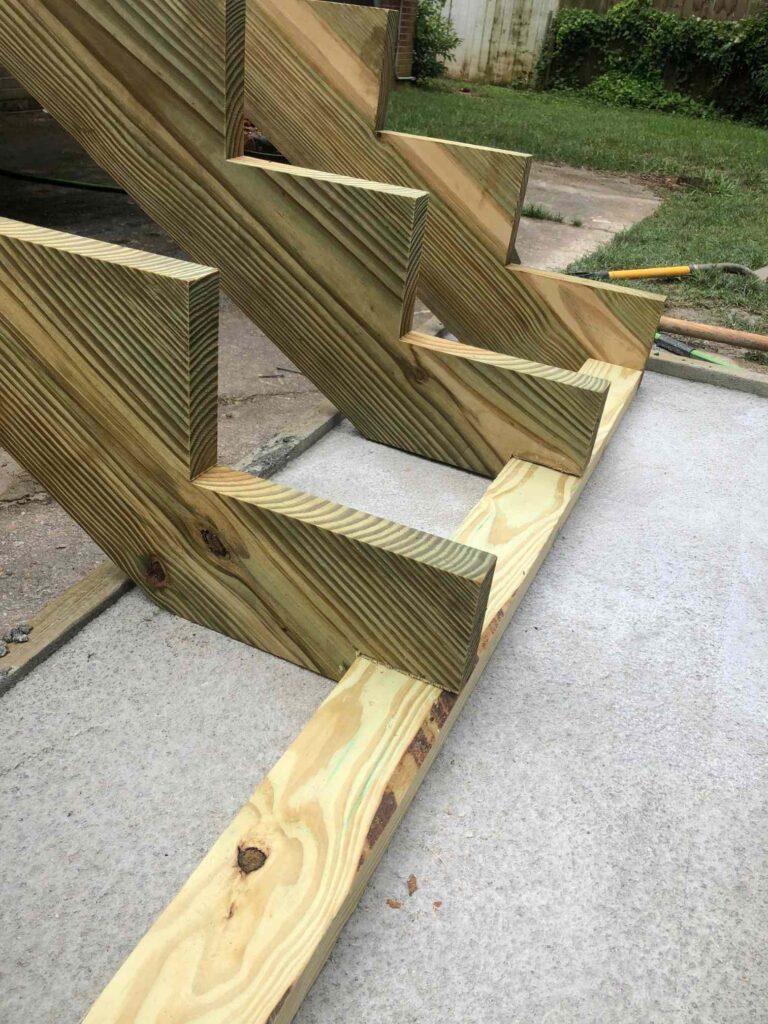
You want at least one full foot-width of pad on each side of the stair stringers and at least one comfortable step-depth of pad in front of the bottom stair. A pad that’s too small on the sides is a trip hazard. A pad that’s too shallow in front forces an awkward step-off that will annoy everyone who uses the stairs indefinitely.
For a standard 36” wide stair assembly, a minimum pad size of 48” wide x 36” deep works well. Go bigger if the space allows — you won’t regret extra landing space.
Step 3: Build the Forms
Cut your plywood pieces to the dimensions of the pad and screw them together tightly at the corners. The form must be level — use shims under the form base if the ground is uneven. Any gap in a form joint means concrete leaking out and a messy, irregular edge on the finished pad.
Drive stakes into the ground on the outside of the form and screw through the stakes into the plywood to keep the form from blowing out when you pour. Concrete is heavy — an unsupported form will flex and bow under the weight.
Tip: If you’re in a freeze-thaw climate, add 2–3 inches of compacted gravel inside the form before pouring. This improves drainage below the pad and significantly reduces cracking from ground movement over winter.
Step 4: Mix and Pour the Concrete
Honestly, this is the least enjoyable part of the project. Mixing bags of concrete by hand is hard work and the volume is always more than it looks. Mix to a peanut butter consistency — not soupy, not crumbly. Soupy concrete is weak concrete; it shrinks more as it cures and has lower final strength.
Pour the concrete into the form and use a scrap 2×4 to screed across the top of the form — drag it back and forth to create a level surface. Work out air bubbles by tapping the outside of the form with a hammer.
Reminder: Buy your extra bags before you start. Running out mid-pour while the concrete already in the form begins to set is genuinely stressful and can leave you with a weak cold joint between pours.
Step 5: Smooth and Edge the Surface
While the concrete is still workable, use a float to smooth the surface and an edging trowel to round off all four top edges. This step is not optional — a sharp concrete edge at shin height will eventually draw blood. Round every edge.
⚠️ Safety note: If the concrete has already cured before you get to the edges, use an angle grinder with a concrete grinding wheel to smooth them down. Wear eye protection and a dust mask — concrete dust is a serious respiratory hazard.
Step 6: Cure and Strip the Forms
Cover the finished pad with plastic sheeting and let it cure. Strip the plywood forms after 24 hours. Wait a minimum of 7 days before anchoring stairs to the pad — concrete reaches adequate strength for fastener installation at 7 days, though full cure takes 28 days.
Keep the pad damp during the first 3–5 days of curing if the weather is hot and dry — slow curing produces stronger concrete than fast drying.
Anchoring Deck Stairs to the Concrete Pad
Once the pad has cured for at least 7 days, anchoring the stairs is a straightforward process. Here’s the exact method:
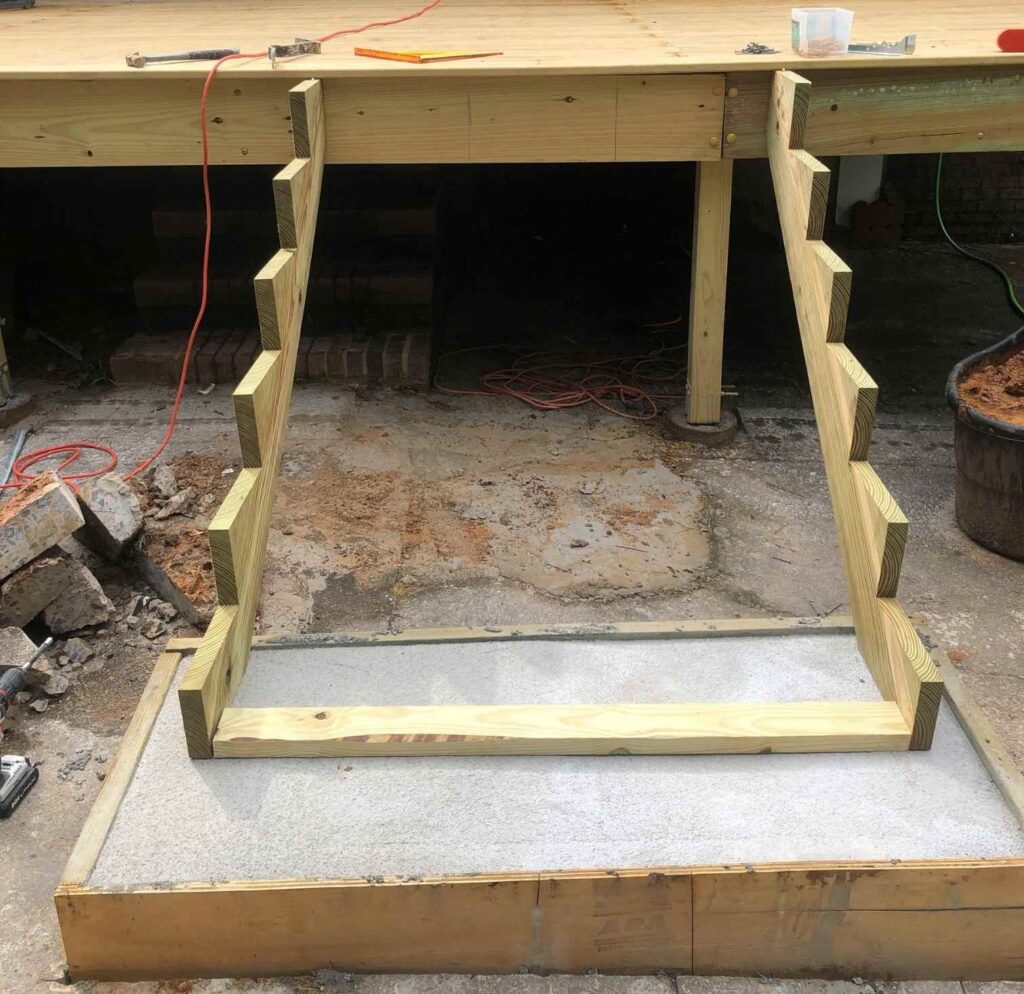
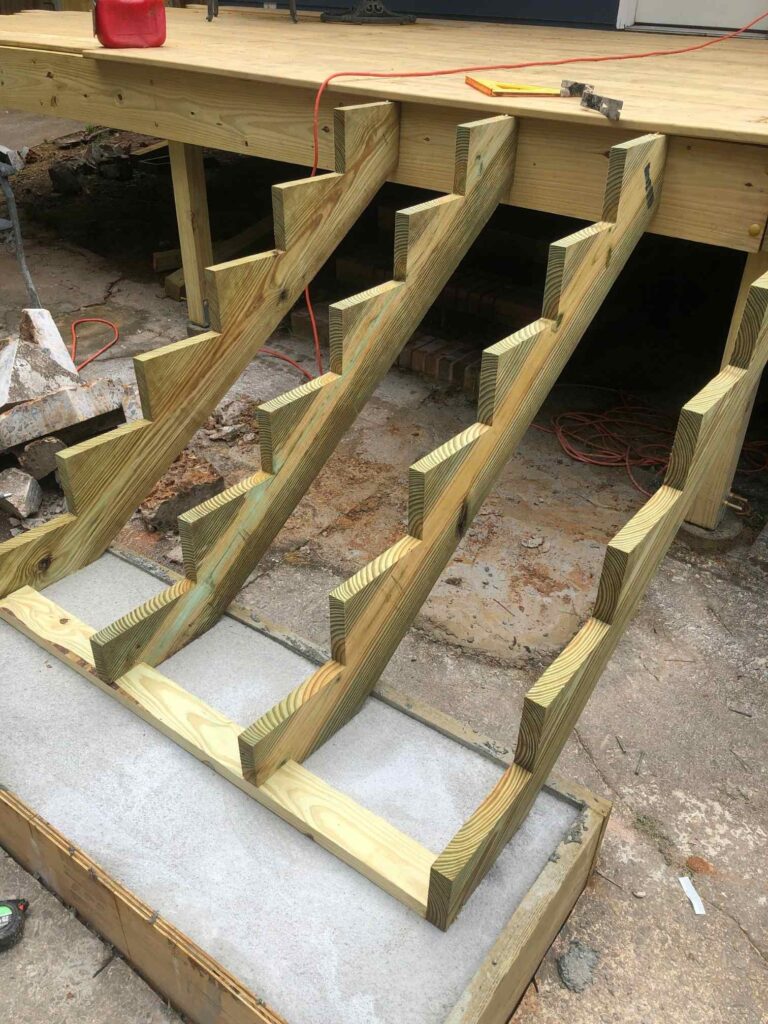
- Cut a pressure-treated 2×4 to the full width of the stair assembly, spanning all stringers.
- Position the stairs on the pad exactly where they’ll permanently sit. Make sure the stairs aren’t stressed left or right — they should sit naturally flat with no twist.
- Drill through the outer stair stringers into the 2×4 to attach them as one piece. The 2×4 and outer stringers are now a single unit resting on the concrete.
- Notch out the interior stringer(s) to fit over the 2×4 as shown in the photo above. Attach these interior stringers to the 2×4 using deck screws driven at an angle.
- Drill pilot holes through the 2×4 into the concrete. Use a standard wood bit to drill through the 2×4 first, stopping at the concrete surface. Switch to a masonry bit and drill into the concrete.
- Drive Tapcon concrete screws through the 2×4 and into the concrete. Tapcons self-tap into the pilot holes and bite into concrete far more reliably than standard concrete anchors — they’re the right fastener for this application.
- Test the assembly by putting your full body weight on the stairs and pushing laterally in both directions. There should be zero movement. If it shifts, add more Tapcons.
Once the stairs are anchored and confirmed solid, install your risers and treads. The landing pad project is done.
Frequently Asked Questions
How thick does a concrete landing pad need to be for deck stairs?
A minimum of 4 inches for a residential stair landing. If you’re in a freeze-thaw climate, go 6 inches and add a compacted gravel base for drainage. Thicker pads resist cracking from ground movement significantly better than minimum-thickness pads.
How many bags of concrete do I need for a stair landing pad?
Use a concrete calculator to get your exact number, then add 2 bags. For a typical 3×4 foot pad at 4 inches deep, expect 4–6 bags of 80lb Quikrete. Running out mid-pour is one of the most stressful DIY situations you can find yourself in — extra bags can always be returned.
How long before I can attach stairs to the new concrete pad?
Wait a minimum of 7 days before drilling into the pad for stair anchoring. Full cure takes 28 days but 7 days is adequate for Tapcon installation. Don’t rush this — drilling into concrete that hasn’t reached adequate strength can crack the pad around the fastener hole.
What screws do you use to anchor deck stairs to concrete?
Tapcon 1/4” x 2-3/4” concrete screws are the industry standard for anchoring pressure-treated lumber to concrete. They self-tap into pre-drilled pilot holes and are specifically rated for structural applications. Don’t substitute with standard lag shields or wedge anchors for this type of connection — Tapcons are purpose-built for exactly this application.
What to Tackle Next
A solid landing pad and anchored stairs are the finishing touch on a deck build that started with the structure itself. If you haven’t already read the full guide to building a raised deck over concrete, that’s the companion piece to this one — it covers the full project from footing to deck boards. And if cutting through an existing slab was part of your project, the guide to cutting a hole in concrete covers that step in detail.
If the deck is part of a larger split-level renovation, the complete split-level modernization guide covers every major project in one place — from opening up the floor plan to finishing the lower level.

Max
Max Lowrie, founder of MySplitLevel.com® and author of The Live In Flip© bought his first split level house in 2016. During a lengthy renovation, Max noticed that there was little useful content online specific to split-level homes. Max now devotes his time to share his knowledge hoping to help homeowners avoid unnecessary mistakes, and provide a blue print for split-level owners nationwide.
Giveaways, Ebook, and Forum coming soon. Be the first to know about new content!